FormboardEnterprise Feature
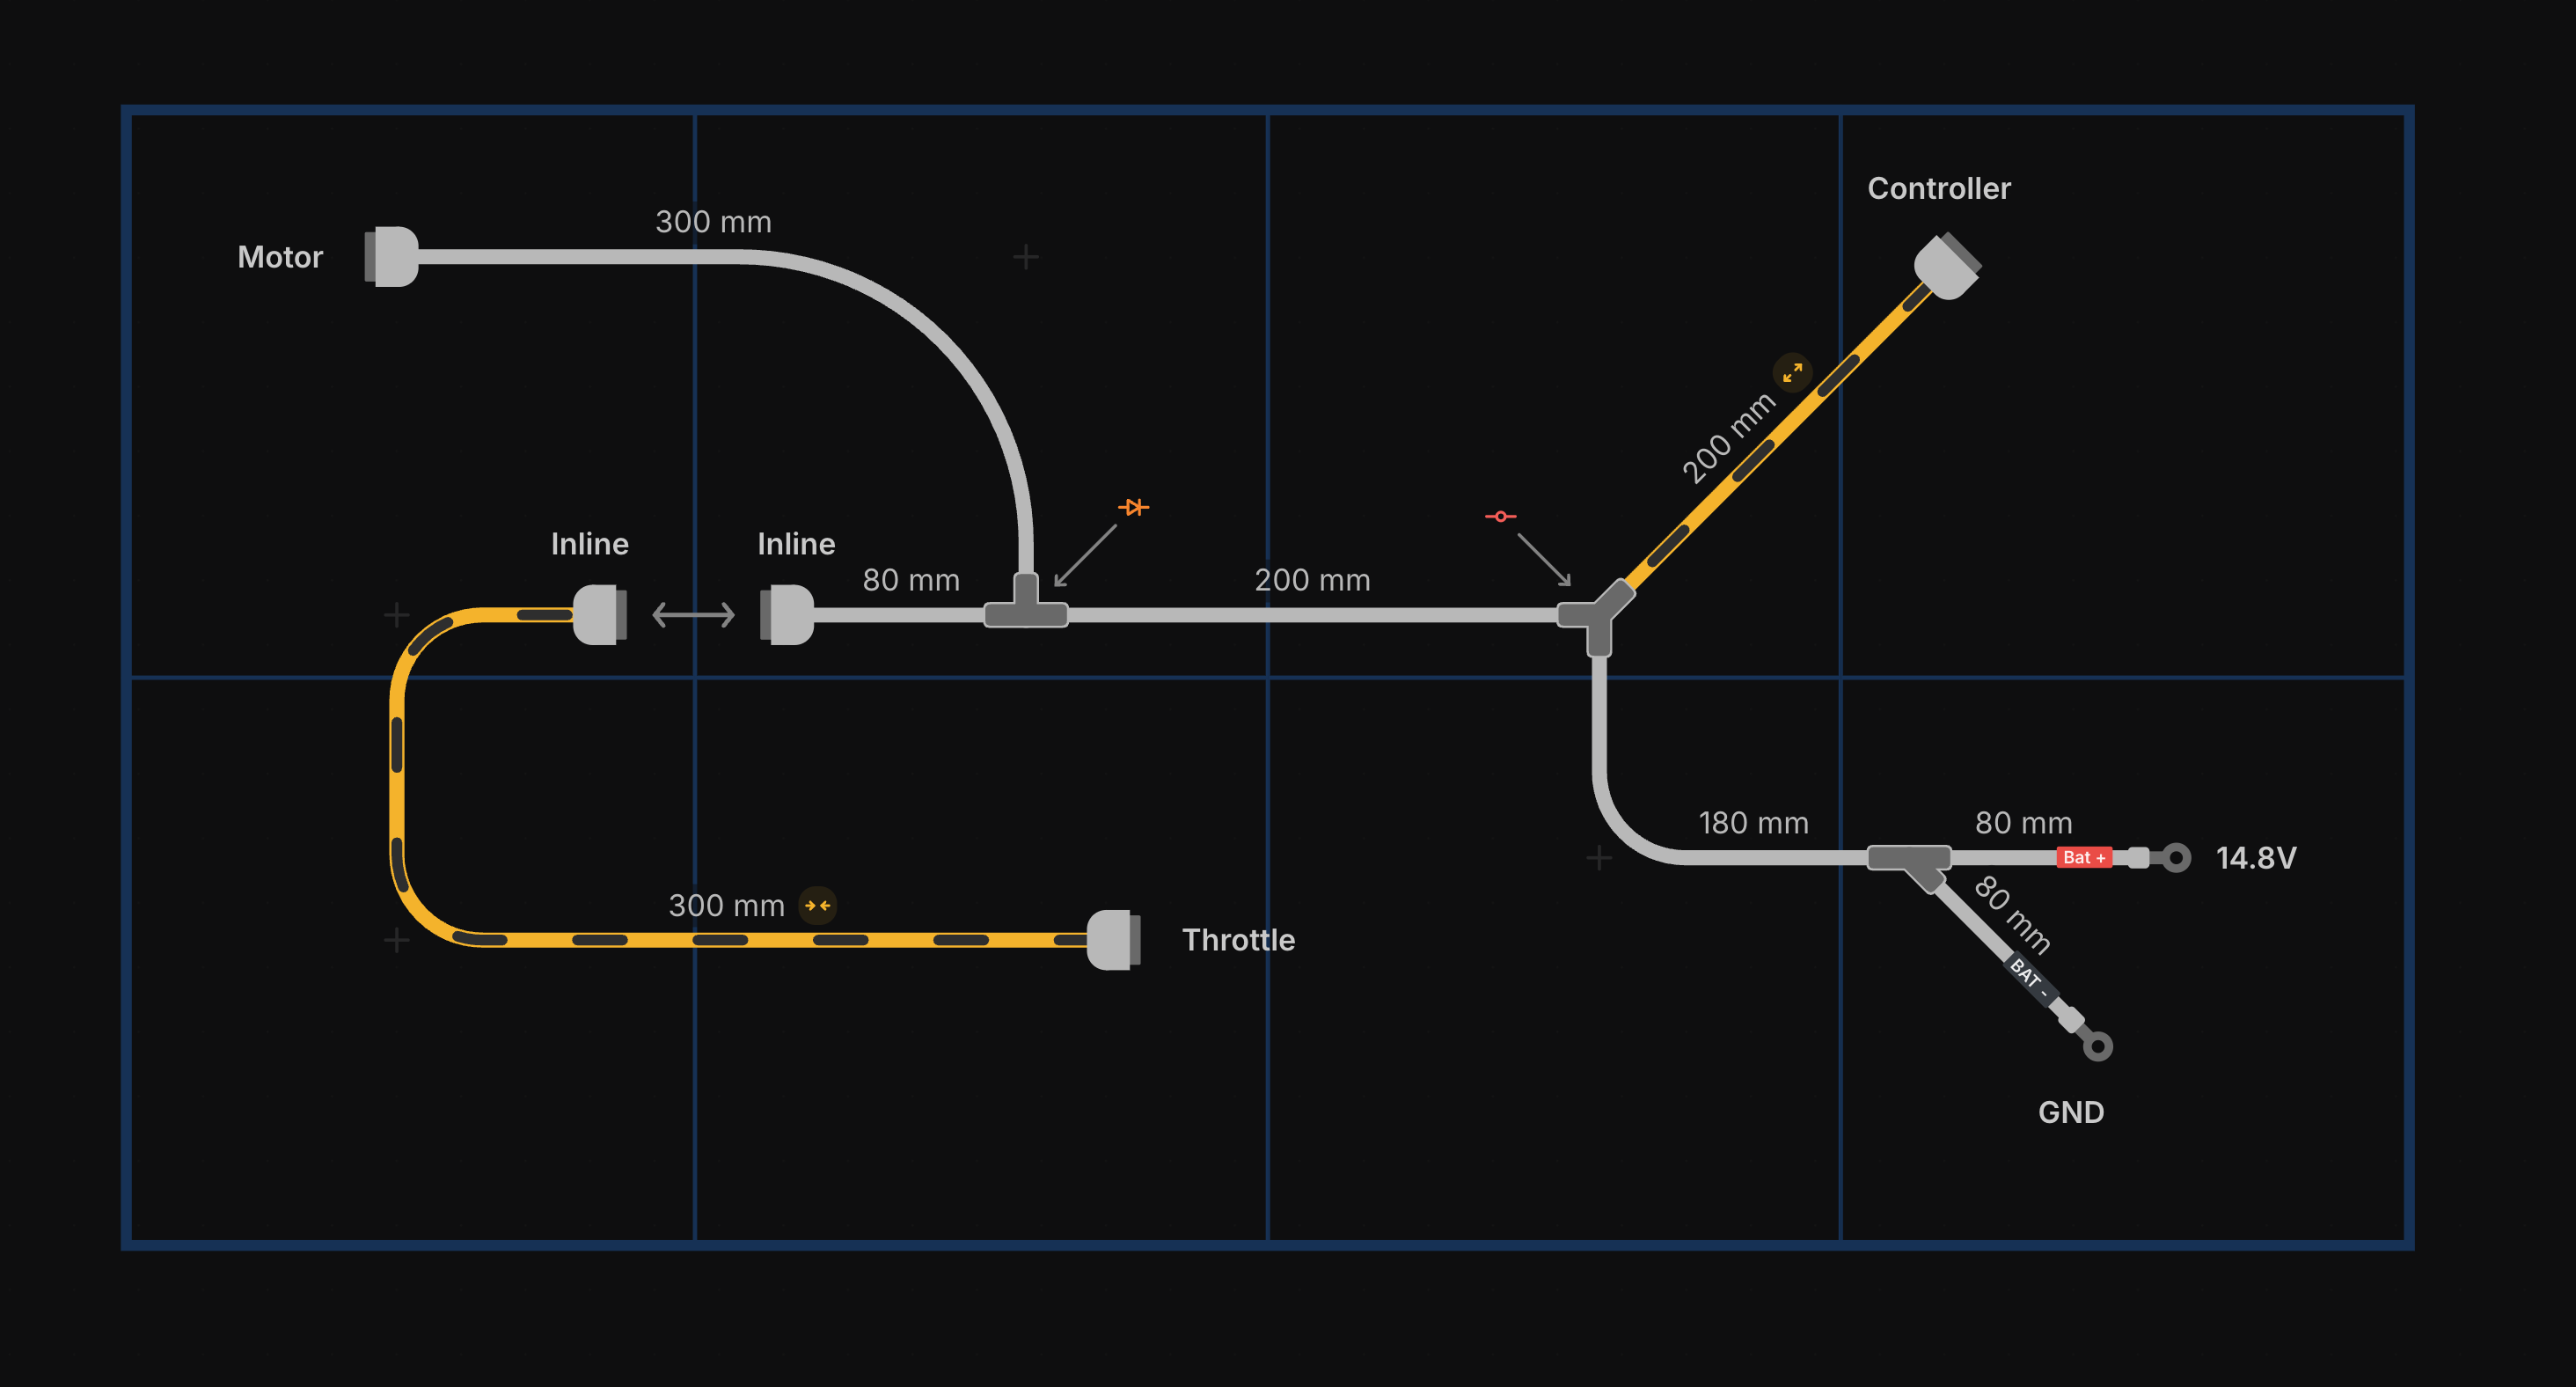
Formboard mode turns the Layout view into a 1:1 physical scale drawing of your harness. The lengths you see on the canvas correspond directly to real-world measurements.
When formboard mode is on, the layout view changes to support physical assembly: snapping to grid is removed, bundles bend with a real corner radius, and bundles can be set to their actual lengths.
Formboard layout is an Enterprise feature. You need an Enterprise subscription to enable it and to edit a formboard harness. Without Enterprise you can still open and view a harness that is already in formboard mode, but the layout is read-only. See the Plans page or visit app.harness.design/upgrade to upgrade.
Turning on Formboard Mode
- Open Main Menu → Settings → Formboard.
- Turn on Use formboard for layout.
The layout view immediately re-renders at 1:1 scale, centered on the formboard panel.
Formboard Settings
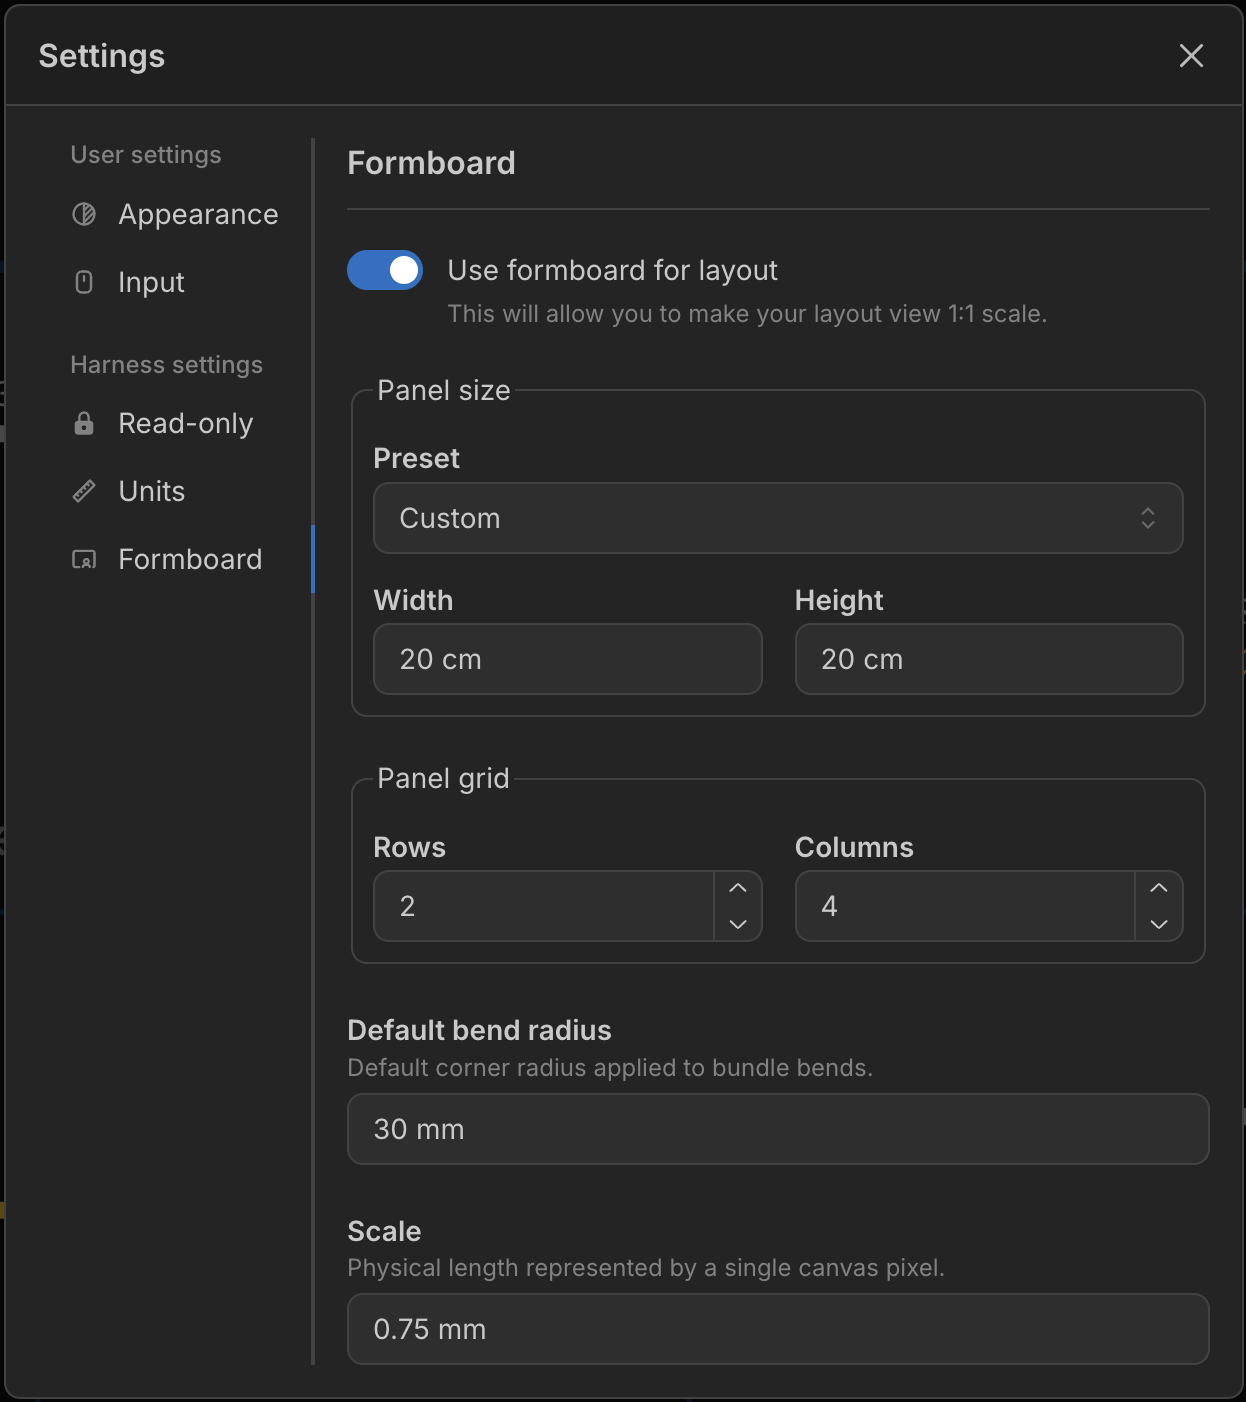
Panel size
The physical size of a single panel. Panels are the sections your formboard is divided into.
Preset - Choose a standard panel size (
A4,A3,A2,A1) orCustomto enter your own dimensions.Orientation - Set a preset panel to
LandscapeorPortrait. (Hidden when the preset isCustom.)Width / Height - The exact panel dimensions. Editable only when the preset is set to
Custom; otherwise they follow the chosen preset and orientation.
Panel grid
Arranges multiple panels side by side in a grid to make up the full formboard. The overall board size is the panel size multiplied by the grid.
- Rows - Number of panels down (1–64).
- Columns - Number of panels across (1–64).
Default bend radius
The default corner radius applied where a bundle bends. You can override this for individual bundles — see Changing the Radius of a Bundle.
Scale
The physical length represented by a single canvas pixel. This effectively changes how large the component previews and labels are compared to the board.
Setting a Bundle to 1:1 Scale
Bundles that are not to scale, or that have no set length, are drawn as yellow lines with black dashes so you can spot them at a glance.
There are a few ways to make a bundle’s drawn length match its set length so it renders to scale — adjust one at a time, or set the whole harness at once.
Use the match button
Whenever a bundle isn’t to scale, a yellow button appears on its length label. Click it and the bundle’s path is automatically adjusted so it is drawn at exactly its set length.
Drag a component into place
As you drag a component, a blue line previews where the connected component needs to be placed for the bundle to be to scale. The component snaps to that location. When the bundle is to scale, the line turns green.
When you edit a bundle’s length, the layout is automatically adjusted so the bundle is drawn to scale at the new value.
Set the whole harness to scale at once
A Set all bundle lengths to scale button in the controls at the bottom-right of the layout view does the whole harness in a single step: it moves components so that every bundle is drawn at its set length, exactly as if you had clicked the match button on each one.
Changing the Radius of a Bundle
right-click a bundle and set a value in the Radius field to change how tightly that bundle bends. Leave it empty to fall back to the Default bend radius from the formboard settings.
Bending Branches
Drag a single branch point and the entire branch connected to it moves with it — every component keeps its position and angle relative to that branch point, so the whole section swings as one rigid unit. Use this to bend and reposition entire runs of the harness at once.
To move connected components without rotating them, select them all with a click-and-drag box and move them together — dragging a multi-node selection translates only, with no rotation.
Exporting your Formboard
From Main Menu → Export, a formboard harness gains an extra Formboard Panels option.
It exports a PDF with one page per panel in the grid, each page sized to your panel size and drawn to scale. Print the pages, lay them out in the same grid arrangement, and build the harness directly on top — for example, an A3 panel with a 2 × 4 grid prints as 8 to-scale A3 pages.
The number of pages equals the Rows × Columns set under Panel grid. The
standard
Export → Layout PDF still renders the whole formboard onto a single 1:1 page.